QGIS Integration
This tutorial explains how to view Vantor imagery tilesets in QGIS, using the WMTS service. This integration requires QGIS version 3.16 (Hanover) or higher.
This tutorial describes the following steps:
- Creating a new WMS/WMTS layer
- Creating a new database connection
- Configuring OAuth2 authentication
- Connecting to the database to return a list of tilesets
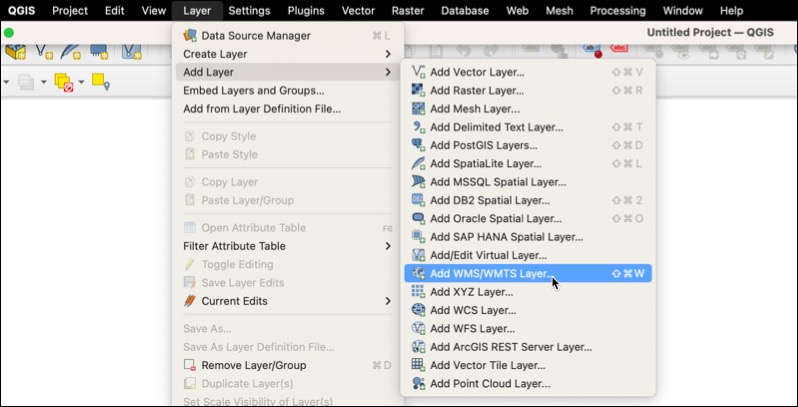
Create a new layer
In QGIS, Open an existing project or create a new one. From the top navigation menu, select Layer > Add Layer > Add WMS/WMTS Layer.
This will open the “Data Source Manager” window. From the Data Source Manager screen, choose "New" to create a new connection.
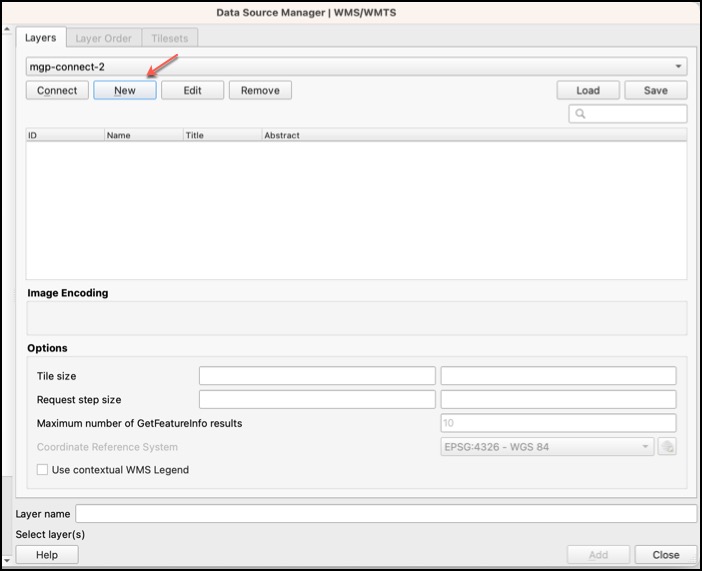
The "Create a New WMS/WMTS Connection" form will open.
Create a new connection
The WMS/WMTS connection form requires the following:
- Connection details
- Authentication
- Advanced settings
This example shows a completed connection form. The steps to complete the form are described below.

Connection Details
Give your connection a name, then copy and paste the URL from the table below.
| Field | Value |
|---|---|
| Name | Provide a name for the connection. |
| URL | https://api.maxar.com/streaming/v1/ogc/gwc/service/wmts |
Authentication
To configure OAuth 2 authentication:
- Click the green "plus" sign in the Authentication section. This will open a new form.
- Choose "OAuth 2 authentication" from the dropdown menu.
This example shows a completed Authentication form.

| Field | Value |
|---|---|
| Name | Create a name for the authentication configuration. For example, "User Credentials". |
| id | auto-generated value |
| Resource | No value needed |
| Authentication menu | Choose "OAuth2 authentication" from the dropdown menu |
| Grant flow | Choose "Resource Owner" from the dropdown menu |
| Description | Optional description of the connection. This can be left blank. |
| Token URL | https://account.maxar.com/auth/realms/mds/protocol/openid-connect/token |
| Refresh token URL | https://account.maxar.com/auth/realms/mds/protocol/openid-connect/token |
| Client ID | mgp |
| Client secret | No value needed |
| Username | Your username is the email address used to create your account. |
| Password | Your password |
| Scope | No value needed |
| API key | No value needed |
Advanced setup
In the "Advanced setup" section, set up the authorization header.
- Under Access method, choose "Header" from the dropdown
- In the Token header box, type Authorization
Save your authentication configuration
Once the form is filled out, click save at the bottom of the form. This will return you to the WMS/WMTS connection window. The name of your authentication configuration will now appear on the connection form.
WMS/WMTS Options
Check the box next to the following items in the "WMS/WMTS Options" section.
- Ignore GetMap/GetTile URI reported in capabilities
- Ignore GetFeatureInfo URI reported in capabilities
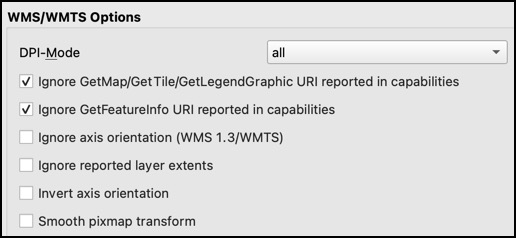
Note: Checking the "Ignore axis orientation (WMS 1.3/WMTS)" option results in no imagery showing when using a tileset with
EPSG:4326projection. You can choose this option for tilesets with other projections.
Save your connection
Once the form is complete, click "OK" at the bottom of the page. This will return you to the Data Source Manager.
Tilesets
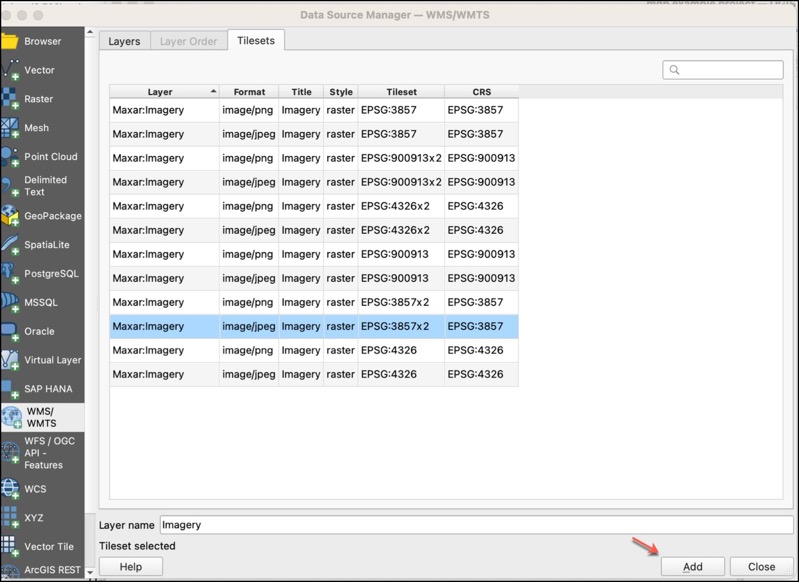
Connect and view a list of available tilesets
Click "Connect" from the Datasource Manager window. This will return a list of available tilesets.
Add tilesets to your project
Select a tile set, then select the "Add" button.
The layer will then populate in your layers tab and imagery should begin to load in your window. Note: you may need to zoom to a smaller scale if this is the only layer in your project to see imagery. To return to the list of tilesets later, choose the layer again from the navigation menu.